URL: http://api.my.yahoo.com/rss/ping Parameter(s): u= HTTP method: GET Mama's Doodles: August 2007

8.30.2007

My New Pretty...

I am definitely a necklace girl. Many days I'll accidentally walk out of the house without my wedding ring, but I rarely forget a necklace. I think of myself as a bit of a collector...and I really enjoy it when my friends say "You're wearing another cool necklace! Tell us how you know the artist behind this one..." I think that's why they are so special to me. I don't have any generic pieces. They are all one of a kinds, hand selected from artists I admire. And, each has a pretty cool story attached about the artist, that I'm thrilled to "know" {and shamelessly plug!!}


The above photo is my newest neck decoration made by of Lisa Leanord Designs.


Lisa has a blog where I watch her designs unfold, as well as enjoy the tales about her little boys. I love the simple classiness of her creations. The style lends itself so very well to imprinted children's names, inspirational words, blog names!, etc. And, her pieces are terribly affordable. I'd added her work to my wistlist not long ago, and still have her earmarked for "the perfect gift."

My piece says "Doodle," which is my daughters nickname. (I'm sorry, I know I repeat that a lot...but I just assume that no one really cares to remember :) Obviously, the gals nickname has also attached itself to my blog(s)and it has more than a singular meaning for me. I also have some well-loved "mommy" jewelry pieces already.. and wanted this one to be different. So, now I'm sporting her nickname too.

It is my hope that my necklaces bring a touch of glamour to my pregnant-mama-transitional-stage-uniform of gaucho pants and too tight in the tum-tum tank tops. ...At least it gives me the impression that it does. And, that's just the boost I needed. :)

**The infamous "Doodle" herself helped with the photography today, which ended up in way more pictures than I anticipated. That girl sure knows how to style a photo!! :)

Labels: , ,

Coloring Pages

I've also posted this on Kenzie's doodles , so you can save yourself a few seconds if you've already read it over there!


I'm taking a brave step into using my photoshop program. I'd like to play around with digital illustration, but I find the whole photoshop process terribly overwhelming. Today, while playing around I discovered that I can create coloring pages from digital photographs in just a few steps. Kenzie prefers this one, although there were other photos better suited to the process.

To make your own coloring pages:
1. Open an image in Photoshop and size to fit your paper. I've been using an 8x8 size.
2. Create a "duplicate layer."
3. Make sure your foreground is set to black and the background is set to white.
4. Go to Filter--> Sketch --> Photocopy and adjust the detail and darkness settings.
5. Clean up the image by adjusting the levels. Go to Layers--> New Adjustment Layer --> Levels and move the slides accordingly until the image is crisp.
6. Print!!

*** You may need to tweak these directions depending on the photo. Some photos required that I "reverse" the image with: Image>Adjust>Invert. Whatever, the case - don't ask me!! I'm truly a photoshop novice.

I'm imagining coloring books, which would be supersweet gifts to cousins or a great memento of a birthday party or other big event... You could create a book of family members that aren't seen as frequently as you'd like... This could be a fun playdate activity, etc.

We're off to color Kenzie some purple hair!!

**P.S. I'm sure this a "been there done that" concept for many of you. I, however, was thrilled to end up with anything usable from my first photoshop experience. :)

8.29.2007

Another Copycat Craft


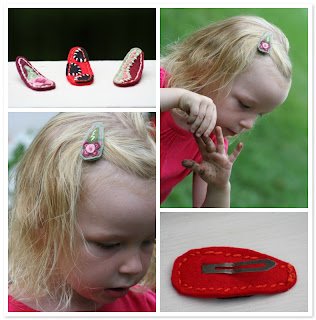
I've been making these little clips for my daughter's wild, wild bangs. I haven't been able to find store bought clip/barrettes that will actually stay in her super-duper-fine hair. So, I made my own.

The idea is not uniquely mine, of course. I saw something similar on a small tyke wandering about the city and withheld myself from wrenching it off her head to inspect its construction. Thank gosh for impulse control. It's not good to be a stranger acting strangely, eh??

The clips are a fun and instant gratification project.... A quick and mindless construction, good for hours in front of the television or sitting outdoors sweating while the kiddo plays. They are easy enough to replace when lost....or, uh...covered in worm gunk or mud. (did you see her fingers in that picture??)

P.S. Thanks for the baby-making well wishes. I've enjoyed the cheerleading and even the "i knew its." :)

Labels:

8.24.2007

me too.

There's another creation in the works. I'm pregnant.


12 week belly self-portrait. Taken from above.

My stomach is expanding at an alarming rate. I've made it to the trimester's end without anyone overtly calling attention to it, and have only spilled the beans twice!! Yet, I've been feeling very self-conscious and am relieved to be able to finally just say it. For those of you who've seen me recently & just thought I was getting chubby...well, thanks for not mentioning THAT.

SO, the cats out of the bag. I join the many who are crafting babies these days. We're excited. We're due March 8.

Labels: ,

8.22.2007

Cheap Cute


My husband is a good find. He shops in the little girls section. He brings stuff home and says "I thought you could embellish it." Love him!

Here's what was originally a $4 PLAIN jean skirt he snatched from the Target clearance rack.
I did what he asked.


I just adore this red & white fabric. It's wild and spirited. I snipped bits of the subject matter out and fused them to the skirt. I then added some red, blue, pink, yellow, green & orange embroidered stitches. This was a great project to tote around with me, while my gal entertained herself with mud cupcakes outside. Oh & in front of the TV, while my husband watched something football related. Sigh.

The outcome isn't painfully girly. I like that.

My favorite part of the scene:

Labels: ,

8.21.2007

Stroller Quilt


Yeah..it's hot outside and I'm making big freaking thick blankets for our stroller. The logic in that is lost on me too, folks. I guess I just like to stay productive. (or wishful of cooler weather)

We got a new bike-trailer for Kenzie, who was exceeding the poundage on our ride-a-long bike seats. The trailer also transforms into the lightest stroller I've ever pushed!! I tend to do a lot more walking and biking when it's cooler outside. And Ms. Kenzie usually requires a blanket. So...now I'm ready.

We also do a lot of camping (or used to in California anyway). I made sure that this also fit our camping chairs. For snuggling up around the campfires... It'll keep those tooties nice and warm.


I used the brilliant "peek-a-boo-bunting" tutorial offered in the margin at Joybucket. I adjusted it according to my stroller/chair dimensions, so that it's big-kiddo-double-stroller-sized. This quilt is THICK, and I probably wouldn't recommend (or try) that thickness again - as it made button holes absolute bloody hell. Yet, the quilt will suit it's purpose. And, it's damn cute to boot. Not to mention that I used an old piece of textile art that had been sitting around for awhile!


The quilt ties at top, to keep it from slipping down. For Kenzie, it works well tied one one side, and tucked under her little armpits. The bottom of the quilt, folds -&- buttons into a bit of a pocket for the insertion of the kiddo's feet. Great tutorial!

Labels: ,

8.14.2007

Pattern-making


I'd forgotten that in my effort to preserve Amy's baby shower surprise - I never posted these. They were born of my pattern making stage. That is...before I realized that making my own patterns was really silly. silly. silly.

Oh well, no harm done. Several more babes are a bakin'. I suspect there will be more of these born soon.

Labels: , ,

8.13.2007

Baby Gifts

As mentioned, there are quite a few babies eagerly expected. This is the start of a long line of gifts I'm putting together. The goodies were given to Amy this past weekend at a most excellent bloggy get together aka: surprise baby shower. The get together was again hosted at the beautiful home of Jenny. Gawd, I want her home in a bad way.


Don't know why I insisted on reinventing the wheel. I designed my own pattern for these, knowing full well that they existed somewhere. The pattern I designed for the bib was a copy of one of my favorites from Kenzie was a drooler. The shoes are a near-copy of some Robees shoes that we have a few zillion pairs of. When I got stumped by how to work the elastic, I hunted down Stardust shoes' tutorial and mimicked her approach. And then noticed, that there wasn't much different about my shoes at all. Hmnnn. Could have saved some time and curse words. :)


I made my own patchwork fabric using scraps borrowing Molly Chicken's idea , which I've used a good many times. Fabric like this just looks so cute and kid-like to me.


And, because I'm the tutu lady.. I did one of those too. I kept envisioning the ensemble on a naked pudgy baby during a photo shoot.
Practical? No.
Cute? Of course.

Labels:

8.10.2007

Tutu + Tutorial = Tuturial

Okay, bad joke in the title. My apologies.

I put this tutorial for a super-fluffy "NO SEW" tutu together long ago, but it nearly got lost in the archives. I've been asked "a few" times recently how to design a tutu... So, here's a tutorial for those of you don't want to wrestle tulle, invisible thread, and a sewing machine in order to create the tutu of your little girl's dreams. It's so easy - a child can do it herself! (that is, if she can tie her own shoes!)

Step 1: Cut and sew elastic to form waistband. I use 20 inches for most of my tutus, which fits most kiddos.
Tutu Tiplet: If you wanna go all pro - there are even fun colored elastic cords that can be used instead of plain old elastic. Or you can use a belt!

Step 2: Cut AT LEAST 4-5 yards of tulle into strips. And, cut, cut, cut some more. I do some thicker strips, some thinner. I use 52" wide tulle, so if your tulle is less wide, count on more yardage.
Tutu Tiplet: You can use solely tulle. You can also add in streamers of ribbon, or other whimsies tied in here and there. You can use a solid color tulle, or alternate amongst a few different colors.

Step 3: Tie your strips onto the elastic. I vary the length of some, just to give it more poof and visual layering. Align your knots all on one side of the waistband, of course. They don't HAVE to be crammed together. As long as you use 4 yards worth of 52" wide tulle, the tutu will be immensely fluffy.
Tutu Tiplet: I put the waist band around my leg, slide up thigh-high..and it makes tying and controlling the tulle a lot easier!


Voila. An easy-peasy tutu in three easy steps (not counting the hours and hours of laborious tying BEST SPENT IN FRONT OF THE TV.)
___________________________________________________________________________________
Tutu Tiplet: If it's a tutu emergency and you'd like to save yourself the headache - there's always tutu offerings at The Doodle Factory . I don't sell this style, however. :)

***you can also make a mini-version and use for a pony-tail holder!

Labels: , , ,

Kenzie's doodle: An elephant

It was an adamant and persistent request that we make art. That we make an elephant today. RIGHT NOW. Frankly, my heart wasn't in it, but Kenzie's sure was. I'm glad I played along though - she does enjoy this so much.

She chose the junks. She did the paints. We both worked on gluing the bits down to create this (which was extremely difficult to photograph for some reason):


A close-up of Mr. Elephant:


More parent/child art collaborations can be found HERE.

Labels: ,

8.09.2007

HI

I've just been unloading some pictures and realizing that I've taken quite the summer vacation from blogging! Summer continues to work me over. Funny, how I look forward to it so.... and then I realize just how friggin' hot it actually is. It's another humble reminder why moving back from California was probably not a terribly sane idea.


So, a quick hello to you all, and an emphatic squeal about some projects I've been working on. Too bad they're all gifts and that whole "surprise" thing has to happen.

I've never been good at surprises....

May we all find that the rest of summer, is a wee bit cooler???

Labels:

8.02.2007

Less is more?

I've had this jacket on my brain for awhile. (this photo "borrowed" from Gap):
My Mom took Kenzie shopping not too long ago and we really liked all the new styles at Gap, sporting the "handmade" look. We did purchase a few of these goodies, but I became obsessed with doing the jacket - MYSELF. (I sound like a toddler, eh?)

The thing is...I can't find a plain jean jacket anywhere! So, I tripped over this one on the clearance rack at Wal-mart of all places for !!$3.00!! I still want to mimic the art on the jean jacket too, but I guess I'll have to be patient and wait until it's jean jacket season to buy one.

MY BARGAIN "BEFORE SHOT":


This little jacket was pretty cute all by itself. But, I jazzed it up with some ribbon trim and a little embellishment on the back. I intended to add some embroidery, but it's sat like this for a few days. Kenzie loves it, and now I'm inclined to leave it alone. That way the two jackets will have two distinct personalities, once I accomplish the Gap Blue-Jean Jacket Hack Job!

THE BARGAIN "AFTER SHOT":


Labels: , ,